Friday 26 November 2010

Designing Text

I have decided to begin building the text in 3D. In create I clicked on shapes and selected the text object. I wrote the text Essex in the Box and dragged it into place on the screen. In the modifier list I chose Bevel and changed the height and outline. I then created a material and applied this to the text. Then in Views I clicked on create camera from view and turned on the auto key, I then set moved the text around experimenting with different angles. I played back the timeline and the text spun around. The text is simple to create, we need to discuss as a group how we want it to appear and also colour schemes.


Thursday 25 November 2010

Designing the Aircraft: Part 8


I have began animating different scenes with the aircraft show different angles the aircraft in flight. I have now created a scene for which the aircraft can fly through. As all the scenes are of the plane in flight I have created a basic backdrop by cutting a sphere in half and adding a material to it. I also tried another method by clicking on rendering > environment and selecting use map,click on none and then bitmap and select the image. Then in the material editor I dragged the environment map across to a new default and made an instance. Then when rendered the you can see the cloudly environment.

I have uploaded some renders that I have made of the aircraft experimenting with different views and camera angles.


Designing the Aircraft: Part 7

I am really pleased with how the aircraft is looking. I experienced a few problems with the particles because when the aircraft moved round the path they did not stay behind in a single line and squirted out around the entire scene. After trying a few things I could not fix this and decided that I would use the particles only when the aircraft is animated in a straight line. This would not be a major problem as the red arrows do not always emit smoke all the time.

The next stage was to set up a camera to follow the aircraft whilst it was moving. I decided to use the same technique as before and put the camera on a path so it would again flow consistent. I created a spline that would act as the path and created a target camera, I then clicked in the motion panel and selected position, choosing path constraint. I then selected add path in path parameters and clicked on the path. The camera then attached to the path and moving the timeline the camera moved along the spline. I noticed that when the camera moved along it did not keep up with the aircraft, I changed the target so it was directly on the aircraft and from this it followed it plane all the way around.


As you can see from the screenshot the camera is targeting the aircraft.


Wednesday 24 November 2010

Designing the Aircraft: Part 6

Once I was happy with the particles I decided it was time to get get the aircraft animated. I had used animation before in the 3d module last year but needed to refresh my memory on how to do so. Whilst looking at some online tutorials I came across method called 'animating along a path'. I decided to give this ago because this would get a nice flowing stroke for the plane to glide along. Following a tutorial I created a spline that would act as the path, I drew it out and used bendy edges so it would flow smoothly. I then selected the motion panel and opened the assign controller rollout. I then clicked on the assign controller and chose the path constraint. This enabled a new rollout at the bottom of the motion panel called path parameter. I then clicked on add path and then selected the spline. The aircraft was then attached to the start of the path. Using the timeline the aircraft moved round however it did not turn and it stayed on its side so the nose was not going round first. I changed this by clicking on follow in the path parameters options.


Below I have experimented with creating a scene to see what it will look like. I will now look at the youtube videos I gathered, that way I can get a better idea of how they fly and what formations they use making them look as realistic as possible.

Wednesday 17 November 2010

Designing the Aircraft: Part 5

The next stage was applying a material to the particles to make it look like smoke. Using the material editor under the maps roll out I chose the box labelled none across from opacity and choose gradiant from the material/map browser. I then changed the gradient type to radial and clicked go to parent. On the basic parameters rollout I turned on Face Map which would map the gradient onto each facing particle. I changed the self illumination to 100 and changed the diffuse colour to a light grey. I then applied the material to the particle by dragging it over and clicking show standard map in viewport to show the material.

The particles looked like smoke blobs instead of a flowing stream of smoke so in order to change this I diffused the colour. On the Maps rollout I clicked on the box none across from fuse and choose particle age. The particle age map changes the colour of each particle depending on its age. I dragged the colour from 1 to 3 and choose swap. I then rendered the image to see what it looked like.


I am very pleased with the smoke so far, I have suprised myself with how well I have completed it. Its not finished yet and needs tweeking so the smoke looks thicker and lasts longer but overall a good start! I will also change the particle colour to blue and red when I render some scenes to add colour.

Monday 15 November 2010

Designing the Aircraft: Part 4

The next stage was to create the smoke coming out of the airvent at the back of the aircraft. This stage was vital to complete because this symobilses the red arrows and I wanted to get this right. To start with I had no idea how to create the smoke as I have never done this before. I began looking at tutorials online and decided to try creating the smoke using a super spray particle emitter. Usint the create > Geometry and selecting particle spray I clicked on super spray and placed it into the scene. I then modified the settings by clicking on the modify tab and then basic parameters. I then clicked on the Modify Panel to fond the Particle Generation parameters and applied some changes to the speed and variations. I then changed the particle size. I then made the Particles facing by clicking in the standard particle box and changed the Object Motion Inheritance and set the multipler. To make the smoke appear more realistic I then randomised its movement by creating a drag force Create>Space Wrap>Drag. The drag force allows the particles to moved in one direction. I then had to bind the drag force to the super spray and done this by clicking and the icon in the tool bar menu at the top and then drag it over the super spray to bind them together.


The finished particles from the tutorial look very small.


The finished particles looked very small but the tutorial I found was for cigarette smoke. Referring back to the tutorial I played around with the different settings to change the size and amout of particles, I also changed the speed at which they moved and played around with it until I was happy.

Wednesday 10 November 2010

Designing the Aircraft: Part 3

Once I was happy with the model it was time to apply a material too it. I decided that the best way to do this was to use a term know as UVW mapping. I had never used this method beforeso was keen to learn a new skill.

In the modifier panel I clicked on Unwrap UVW, scrolling down to Edit UVW I then clicked to flatten the map. This allowed each piece to be clearly identified in the box. Choosing Select elements allowed me to individually move the pieces of model around. I chose the ones that needed colour on them and layed them out in the box so it looked like the original model. I had to ensure that all the pieces were kept inside the box. Then clicking on render I changed the height and width to 2048 so it is big enough. I then saved the file as a PNG.


I then opened Adobe Photoshop and created a new layer. Referring to the images I have collected of the red arrow aircraft I carefully copied the colour scheme so it looked exactly the same. Everytime I created a different section I used a new layer and found by 'locking' two layers I didnt edit them all. Once I was happy with the design I saved the image as a JPEG and went back into 3D Max.


Once in back in 3D Max I clicked on material and then diffuse > bitmap > apply. This set the image I had created in Photoshop and by clicking on 'show standard map in view port the UVW mapping was a success!


I noticed from the front of the aircraft that the white strip did not meet up and the back wing did the same. So I unwrapped the UVW Map again and selected the sections of the model I had missed. I then rendered the map and they were now included.

Designing the Aircraft: Part 2

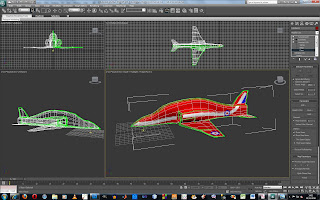
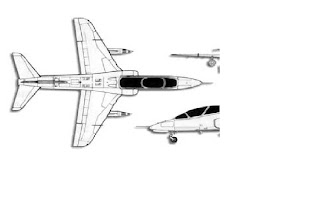
The next stage was to add on the wings. I decided the easiest way to do this would be to cut the model in half that way I could use the symmetry modifier so they would symmetrical. I created a loop round the whole object and using the scale tool I made sure the model was evenly lined up. I then used the extrude tool to create the air shafts at the side of the plane. Using polygon I selected the polys I wanted to used and then using the extrude tool I pulled them out. Then using the X and Y axis I manipulated them into shape. I extruded them in to create the inside of the airshaft and pulled them all the way down to make sure they did not stick out through the sides. I then applied a turbosmooth to give it a nice rounded effect so it looked more realistic.


After this I used the same method to create the wings by extruding polygons that were underneath the air shaft. I carefully selected them and then pulled them out. I used the X and Y axis and moved them into place, so they were ready to be shaped. To shape the wings I need to add more vertices so by using the edge selection I then clicked on Connect in the Edit Edges Box and used the settings to apply how many segments I wanted. I also used the pinch button to manipulate how far apart they were from each other. Havin more vertices to work with I was able to shape the wing.


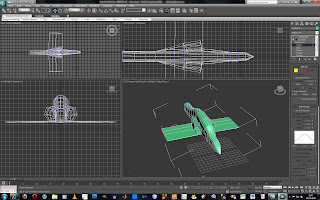
I used the same method again to creat the tail wings extruding the polygons out and manipualting them into the correct place.


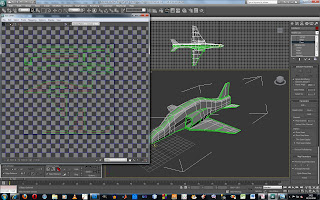
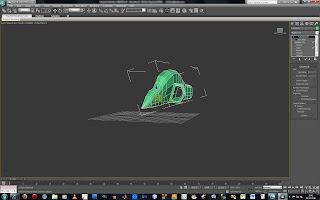
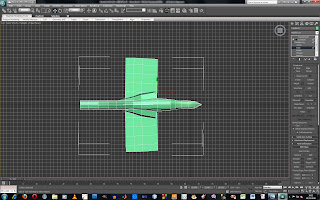
As you can see from the image above that there is still a gap in the model. This was because the vertices had not been joint up correctly. To solve this I selected the vertices and clicked on the weld tool I was able to join them together to make a complete mesh.


Thursday 4 November 2010

Desinging the Aircraft: Part 1

After looking at some images of the red arrows I am ready to begin modelling. I have taken one of the images which I will use a point of reference and I will keep looking at it throughout.

The first thing I done was selected an object and pulled it out. I then converted it to an editable poly and begun stretching and scaling it out. The first part I modelled was the nose of the aircraft, I used the scale tool to pull it out making it pointy.


I then had to use the cut and loop tool to add more vertices this was allow me to model the aircraft better. I then pulled the vertices up at the back to create a tail wing.


Having looked at the tail I decided that it would be best to add it as a plane instead of manipulating the original shape. So I inserted a plane into the scene and referring to the image of the aircraft I used this to create a basic shape.


As you can see the aircraft is starting to take shape...although I cant help but think it looks a bit like a dolphin! I will carry on modelling the shape and add the wings next.

Tuesday 2 November 2010

Southend Air Show

Having looked through various websites and seeking out events that occur in Essex every year, I have decided that I will use the Southend Air Show as my focus point. I did initially think of looking at cinemas, theatres, ice rinks places that are entertaining but then I thought as this is a advertising project I need to foucs on something specific that people would want to come to Essex for. Every year over half a million people flock to Southend on Sea from all over Europe to watch the exciting air show that takes place on May bankholiday weekend. The two day spectacular is a family event one which everyone can come and enjoy for free. A great mixture of flying displays can been from modern RAF and RN participation along with display teams, aerobatic aircrafts and historic aircraft. All in all it is a great event that takes place in Essex one which they are very proud of.


Here is a link to Southend Air show which I wish to recreate.

http://www.youtube.com/watch?v=sC02FOSKXMQ

Here is a link to the red arrows website: http://www.raf.mod.uk/reds/